Imagine your garden adorned with an even greater abundance of vibrant azalea blooms, their rich colors creating a breathtaking spectacle. While purchasing new azalea plants can be an enjoyable experience, there’s an incredibly rewarding and cost-effective method to expand your collection: propagating them from cuttings. Far from being a daunting task reserved for master gardeners, understanding how to propagate azaleas from cuttings is actually quite straightforward and accessible to anyone with a passion for gardening. This comprehensive guide will walk you through every step, helping you transform a single, beloved plant into many magnificent new specimens.
Why Propagate Azaleas from Cuttings? The Benefits of Expanding Your Garden
Venturing into the world of azalea propagation offers a multitude of advantages beyond simply adding more plants to your landscape. It’s a gardener's secret weapon for smart, sustainable expansion:
- Cost-Effective Expansion: Let's face it, acquiring mature azalea plants can be pricey. Propagating from cuttings allows you to multiply your existing favorites virtually for free, saving your budget for other garden delights. This method truly enables you to Grow More Azaleas: Cost-Effective Propagation Using Cuttings.
- Preserving Beloved Varieties: If you have a particular azalea cultivar you adore, propagating it from cuttings ensures that the new plants will be genetically identical to the parent. This is the only way to faithfully reproduce specific hybrids or unique color forms that won't come true from seed.
- Gardening Satisfaction: There's immense joy and a deep sense of accomplishment that comes from successfully nurturing a tiny cutting into a robust, flowering plant. It's a tangible connection to the life cycle of your garden.
- Share the Beauty: Propagated azaleas make wonderful, heartfelt gifts for fellow gardening enthusiasts, allowing you to share the beauty of your garden with friends and family.
- Filling Your Landscape: Whether you're designing a new bed, filling in gaps, or creating a mass planting effect, a steady supply of new azalea plants from your own propagation efforts can help you achieve your landscape goals efficiently.
Essential Tools and Materials for Successful Azalea Propagation
Before you even make your first cut, gathering the right tools and materials is crucial for a smooth and successful propagation process. Preparation is key!
- Clean, Sharp Pruning Shears or a Sterilized Knife: Precision and hygiene are paramount. Clean cuts heal better and sharp tools prevent crushing delicate plant tissue. Always sterilize your tools with rubbing alcohol or a 10% bleach solution before and between cuttings to prevent the spread of diseases.
- Rooting Hormone: Available in powder, liquid, or gel form at most garden centers, rooting hormone significantly increases the chances of successful rooting and speeds up the process. It contains auxins, natural plant hormones that stimulate root growth.
- Sterile Soilless Potting Mix: A light, airy, and sterile medium is vital. Look for mixes containing perlite, vermiculite, and/or peat moss. This combination offers excellent drainage, good aeration for developing roots, and minimizes the risk of fungal diseases that can plague young cuttings. Avoid heavy garden soil.
- Small Pots or Trays: Biodegradable pots, nursery cell trays, or even repurposed plastic cups (with drainage holes added) are suitable. The size should be appropriate for individual cuttings.
- Clear Plastic Dome or Plastic Bags: Creating a mini-greenhouse environment is essential to maintain high humidity around your azalea cuttings, preventing them from wilting before roots can form.
- Misting Bottle: For keeping the cuttings and the surrounding air moist.
- Watering Can or Spray Bottle: For gentle and even watering of the potting mix.
- Optional but Recommended: A Heat Mat: Consistent bottom heat (around 70-75°F or 21-24°C) can dramatically accelerate root development, especially in cooler environments.
- Labels and Marker: To keep track of different varieties or the date cuttings were taken.
Step-by-Step Guide: How To Propagate Azaleas From Cuttings
Now that you're equipped, let's dive into the practical steps of propagating these beautiful shrubs. This is where you'll discover the simplicity of Propagate Azaleas from Cuttings: Your Easy Step-by-Step Guide.
1. Timing is Key: Selecting the Best Cuttings
The success of your propagation hinges significantly on the timing and quality of your cuttings. The prime window for taking azalea cuttings is late spring to early summer, typically after the plant has finished flowering and new growth has emerged. Look for what is known as "semi-hardwood" cuttings – stems that are firm but still flexible, not too soft and green, nor too woody and brittle. These stems possess the ideal balance of stored energy and active growth hormones for successful rooting.
- Choose Healthy Branches: Always select vigorous, disease-free stems from a thriving parent plant.
- Avoid Buds and Flowers: Crucially, ensure your chosen stems have no flower buds or active blooms. These will divert the plant's energy towards reproduction rather than root development, severely hampering your efforts.
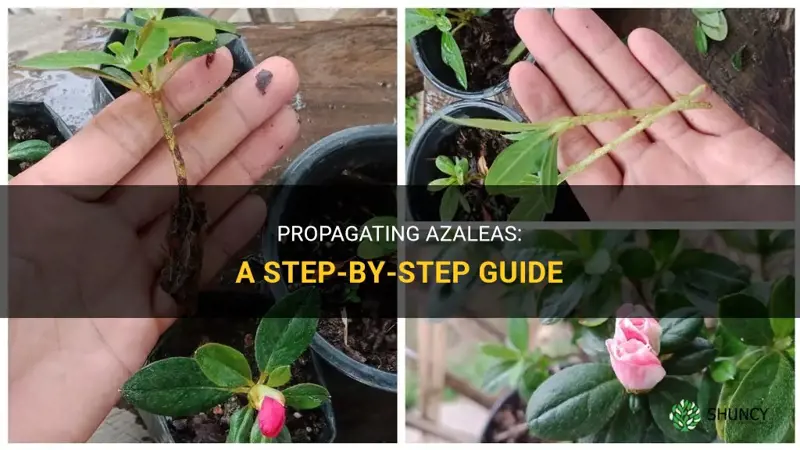
2. Taking the Cuttings with Precision
With your sterilized shears in hand, it's time to make the cut. Aim for precision and cleanliness to give your cuttings the best start:
- Length Matters: Take a stem cutting that is approximately 4-6 inches (10-15 cm) in length.
- Leaf Count: Ensure each cutting has at least 3-4 healthy leaves attached towards the top.
- Clean Cut: Make a clean, sharp cut just below a leaf node (the point where a leaf or branch emerges from the stem). This area is rich in meristematic tissue, which is capable of forming new roots.
3. Preparing Your Cuttings for Rooting
Once harvested, your cuttings need a little grooming to prepare them for their new life:
- Remove Lower Leaves: Carefully trim off any leaves from the bottom 2-3 inches (5-7 cm) of the stem. These leaves would otherwise be buried in the potting mix, leading to rot and fungal issues. The remaining leaves at the top will continue photosynthesis.
- Make a Fresh Diagonal Cut: Using your sterilized blade or scissors, make a fresh diagonal cut at the very bottom of the stem, just below the last removed leaf node. A diagonal cut increases the surface area for rooting hormone absorption and subsequent root emergence.
- Optional Bark Scraping: For slightly woodier cuttings, you can gently scrape a thin strip of bark (about half an inch long) from one side of the stem at the bottom. This further exposes the cambium layer, which aids in root formation, but be careful not to damage the stem too much.
4. Applying Rooting Hormone for Enhanced Growth
Rooting hormone is your cutting's best friend, giving it a powerful boost to develop roots.
- Dip and Coat: Dip the freshly cut end of each azalea stem directly into the rooting hormone powder, ensuring the entire cut surface and the lowest node are thoroughly coated.
- Tap Off Excess: Gently tap the cutting to remove any excess powder. Too much can sometimes inhibit rooting. Always re-seal your rooting hormone container tightly after use to maintain its efficacy.
5. Planting Your Azalea Cuttings
The cuttings are now ready for their new home in the rooting medium.
- Fill Pots: Fill your small pots or trays with the sterile soilless potting mix. Lightly moisten the mix before planting.
- Create Pilot Holes: Use a pencil, dowel, or even your finger to create a small hole in the center of the potting mix in each pot. This prevents the rooting hormone from being rubbed off when inserting the cutting.
- Insert Cuttings: Gently insert each treated cutting into its prepared hole, ensuring the lower node (where you removed the leaves) is buried.
- Firm the Soil: Carefully compact the potting mix around the base of each cutting to ensure good contact between the stem and the medium.
- Water Gently: Water thoroughly but gently immediately after planting to settle the soil around the cuttings. The mix should be moist, but not waterlogged.
6. Creating the Ideal Environment: Humidity and Warmth
This is arguably the most critical stage for successful rooting. Azalea cuttings need a consistently warm and humid environment to prevent desiccation before roots can establish.
- High Humidity Chamber: Place your planted cuttings into a clear plastic dome, a propagation tray with a lid, or cover individual pots with clear plastic bags supported by stakes (to prevent contact with leaves). This creates a mini-greenhouse effect, trapping moisture.
- Consistent Warmth: Maintain an ambient temperature of around 70-80°F (21-27°C). If your indoor temperatures are lower, a heat mat placed under the propagation tray will provide the necessary bottom heat, significantly enhancing rooting speed.
- Bright, Indirect Light: Position your cuttings in a location that receives bright, indirect light, such as near an east-facing window. Avoid direct, intense sunlight, which can scorch the delicate cuttings and dry out the medium. Fluorescent grow lights are also an excellent option.
- Regular Misting: Mist the inside of the humidity dome/bag and the cuttings daily to maintain high humidity. However, be careful not to overwater the potting mix itself, as soggy conditions can lead to rot.
- Ventilation: Briefly lift the cover for 10-15 minutes a few times a week to allow for some air circulation. This helps prevent fungal growth, which thrives in stagnant, humid conditions.
Nurturing Your New Azalea Plants: Post-Rooting Care and Transplanting
Patience is a virtue in gardening, especially when waiting for roots to form. But soon, your efforts will be rewarded.
Signs of Rooting and Continued Care
After about four to six weeks, you should start seeing signs of success.
- The Tug Test: Gently tug on a cutting. If you feel resistance, it's a good indication that roots have begun to form and anchor the cutting in the soil.
- New Growth: The appearance of fresh, vibrant new leaves at the top of the cutting is another strong indicator that rooting has occurred.
- Acclimatization: Once rooted, gradually acclimatize your new azalea plants to lower humidity levels. Over several days or a week, progressively lift the plastic cover for longer periods, eventually removing it entirely. This process, known as "hardening off," prepares them for a normal environment.
- Continued Watering: Keep the soil consistently moist but never waterlogged. As the plant develops roots, its water needs will increase.
Transplanting Rooted Cuttings
When your cuttings are well-rooted and showing robust new growth, they are ready for their next home.
- Choose Larger Pots or Garden Beds: You can transplant them into larger individual pots filled with a suitable acidic potting mix (azaleas thrive in acidic soil, pH 4.5-6.0) or directly into a prepared garden bed.
- Site Selection: If planting outdoors, choose a location with dappled shade or morning sun and afternoon shade, mimicking their natural woodland habitat. Ensure the soil is well-draining and amended with organic matter.
- Gentle Handling: When transplanting, be extremely gentle with the delicate new root system. Disturb it as little as possible.
- Initial Protection: For the first few weeks after transplanting, provide some protection from harsh sun, strong winds, or extreme temperatures to help your young azaleas settle in.
Troubleshooting Common Propagation Challenges
Even with the best preparation, challenges can arise. Here's how to address some common issues:
- Cuttings Rotting: This is often due to too much moisture in the potting mix, non-sterile tools or medium, or leaving too many leaves buried. Ensure excellent drainage and hygiene.
- Cuttings Wilting: Usually a sign of insufficient humidity or too much direct sunlight. Check your humidity dome and relocate to a brighter, but indirect light spot.
- No Roots Developing: Common culprits include insufficient warmth, poorly selected cuttings (too old or too young), or expired rooting hormone. Re-evaluate your conditions and try again with fresh cuttings.
- Pests or Diseases: Monitor your cuttings regularly. Good air circulation (during daily brief ventilation) helps prevent fungal issues. Treat any pest infestations promptly with appropriate, gentle insecticides.
Propagating azaleas from cuttings is an incredibly rewarding endeavor that allows you to expand your garden, preserve beloved varieties, and deepen your connection with the plants you love. While it requires a bit of patience and attention to detail, the process itself is surprisingly simple and accessible to gardeners of all skill levels. By following these steps on how to propagate azaleas, you'll soon be enjoying an even more spectacular display of these enchanting blooms, all born from your own hands.